Hookup Guide for ESP8266 Thing and Blynk
by Max Yi Ren
Introduction
This is a tutorial for people (like me) who have no IoT experience at all. We will skip a lot of the technical details and focus on moving you from “Really I can do this?” to “Oh that’s neat!”. This tutorial mostly follow the official ESP8266 Thing Hookup Guide, but tries to explain a few (dummy) things. The Blynk tutorial is also useful.
Item list
To start, you will need the following items prepared. Note that there are enormous hardware/software combinations to get the same thing to work. I will only go through the easiest way.
- The SparkFun ESP8266 Thing board: “The Thing” combines Arduino Uno and ESP8266 Wifi shield so that you don’t have to purchase separate parts and wire them. However, the shortcoming is that it provides limited pins.
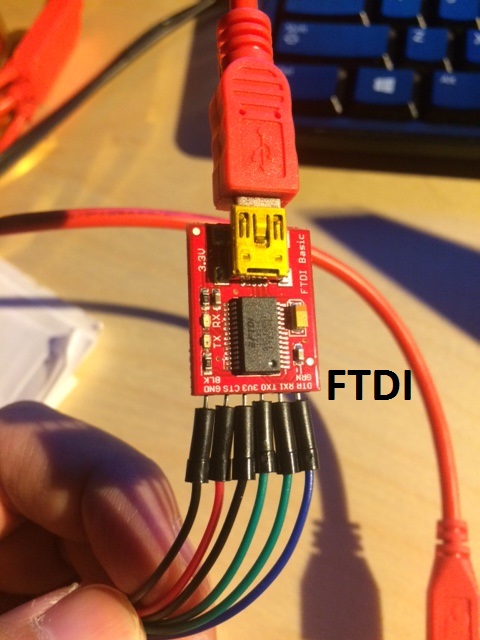
- FTDI Basic -3.3V: FTDI will be connected to the Thing to physically upload your program to it. Both boards run at 3.3V.
- SparkFun Cerberus USB Cable: The cable charges the Thing and allows communication between your computer and the FTDI.
- Jumper Wires and a Breadboard: You will need them to connect FTDI and other chips/sensors of your interest to the Thing.
- Arduino stackable header: I use two of these to connect the Thing to the breadboard.
- Solder: You will need to wire chips/sensors before you can use them. So prepare to solder.
- A Android/Apple smart phone and a computer.
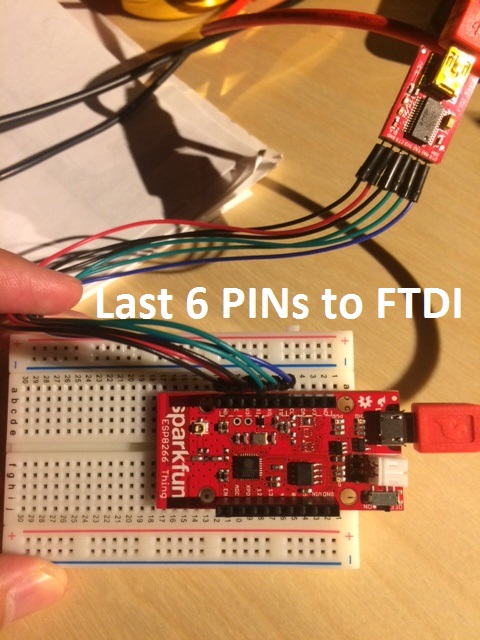
Hardware setup
To test the basic functionality, we will use the following hookup.
Software setup
The following setup should work for both Windows and Linux.
- Download the Arduino IDE and install. It’s free.
- Open the Arduino IDE. Install ESP8266 Arduino Addon:
- Go to File > Preference, type
http://arduino.esp8266.com/stable/package_esp8266com_index.jsoninto the “Additional Board Manager URLs” text box. Hit OK. - Then go to Tools > Boards > Boards Manager, search “esp8266”, and install it.
- Go to Tools > Boards, select “ESP8266 Thing”. If you don’t see it, close and reopen the IDE.
- Go to File > Preference, type
- On your smart phone, install “Blynk” and register. It’s free.
- Download the Blynk library. Unzip it and move it to %myDocuments%/Arduino/libraries (%myDocument% should be %your_user_name/documents% on Windows).
Validation
Before you move forward, I strongly recommend you to go through the cases from the official guideline to see if your setup is all correct.
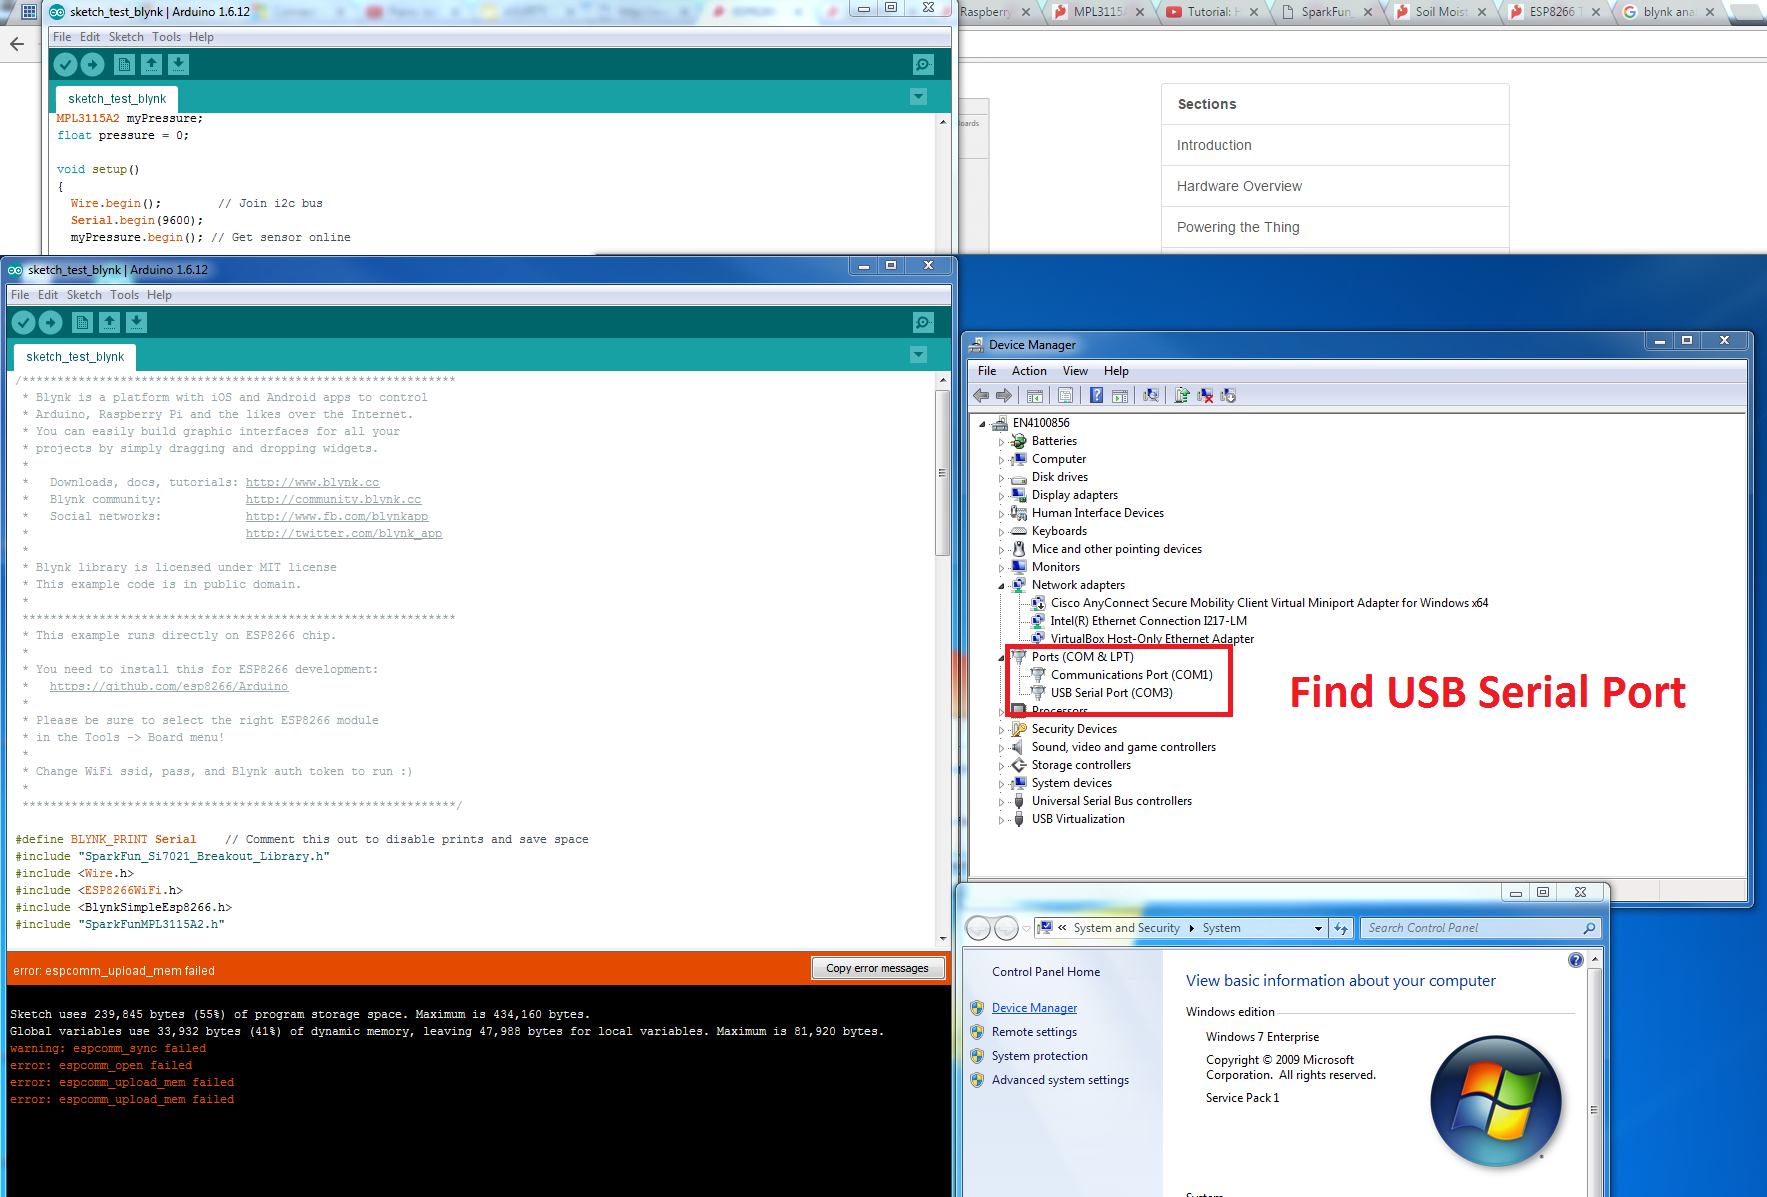
Hint: If you encounter the error: “warning: espcomm_sync failed…”, there could be three reasons:
- Check if the Thing is turned on! The switch is on one corner of the board. You should see a red light on once the board is turned on.
-
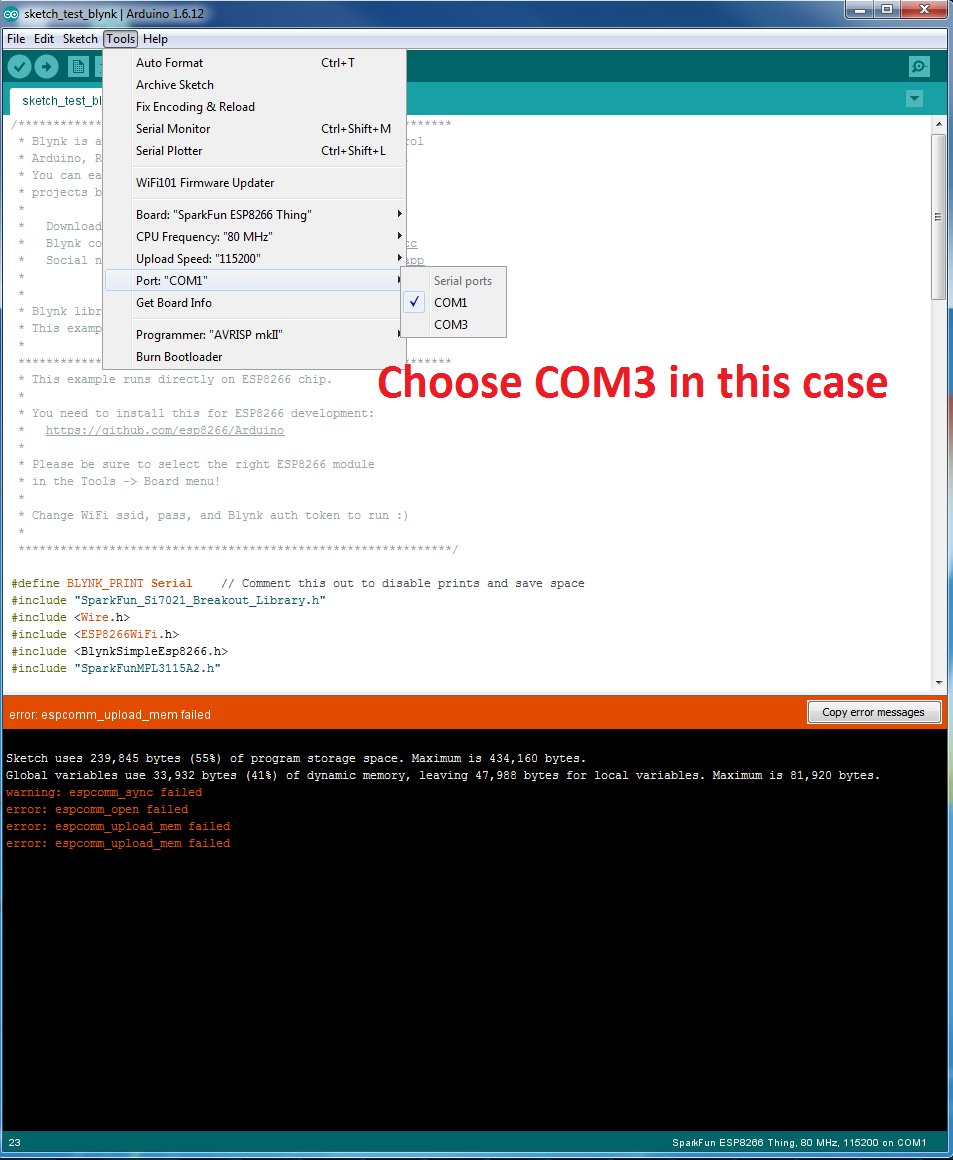
In the IDE, check Tools>Port to see which serial port you are using. Remember that both the Thing and the FTDI are hooked up through USB, the one we should use is the USB Serial Port rather than Communications Port. To find the right port, go to Device Manager (on Windows, it’s under Control Panel>System and Security>System) and check “Ports”. See figure below.
- It could be that your soldering is not well done.
In addition, sometimes this problem disappears when you re-upload, if your Port is chosen correctly.
Case study - Pressure and temperature sensor
Now assume that you had fun with those cases, below we go through the simple setup to read from a pressure sensor (data from board to phone) and to control the on-board LED (data from phone to board).
Hardware configuration
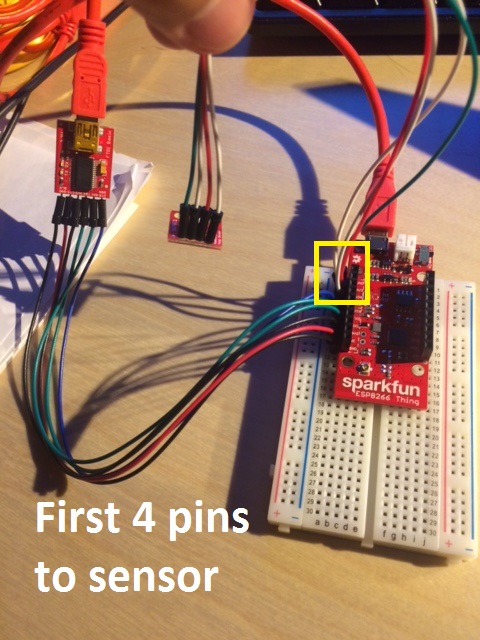
The pressure sensor (MPL3115A2) has four pins: “GND” (ground),
“3V3” (3.3V power), SDA (signal - data), and SCL (signal - clock). You need to solder wires to these
pins, and connect them to the corresponding pins on the Thing. See figure.
Arduino Sketch
For this particular sensor, you need to download its library, unzip the file, and move the unzipped folder to %myDocuments%/Arduino/libraries. Restart Arduino IDE, check to see if you have SparkFun MPL3115A2 Altitude and Pressure Sensor Breakout under File>Examples. If so, you have successfully installed the libraries needed to run this sensor. For other sensors, the same precedure should apply.

Now in Arduino IDE, open a new sketch, compile and upload the following code:
1
2
3
4
5
6
7
8
9
10
11
12
13
14
15
16
17
18
19
20
21
22
23
24
25
26
27
28
29
30
31
32
33
34
35
36
37
38
39
40
41
42
43
44
45
46
47
  #include <Wire.h>
  #include <ESP8266WiFi.h>
  #include <BlynkSimpleEsp8266.h>
  #include "SparkFunMPL3115A2.h"

  // You should get Auth Token in the Blynk App.
  // Go to the Project Settings (nut icon).
  char auth[] = "***"; // ***Type in your Blynk Token

  // Your WiFi credentials.
  // Set password to "" for open networks.
  char ssid[] = "***"; ***your wifi name
  char pass[] = "***"; ***and password

  // pressure
  MPL3115A2 myPressure;
  float pressure = 0;
  float tempf = 0;

  void setup()
  {
    Wire.begin();        // Join i2c bus
    myPressure.begin(); // Get sensor online

    // Configure the sensor
    //myPressure.setModeAltimeter(); // Measure altitude above sea level in meters
    myPressure.setModeBarometer(); // Measure pressure in Pascals from 20 to 110 kPa

    myPressure.setOversampleRate(7); // Set Oversample to the recommended 128
    myPressure.enableEventFlags(); // Enable all three pressure and temp event flags

    Blynk.begin(auth, ssid, pass);
  }

  void loop()
  {
    Blynk.run();
    getPressure();
  }

  void getPressure()
  {
    pressure = myPressure.readPressure();
    tempf = myPressure.readTempF();
    Blynk.virtualWrite(0, tempf);
    Blynk.virtualWrite(1, pressure);
  }
Following is a brief explanation of this code:
- Line 1: Wire.h is necessary to work with the sensor (anything connected to SDA/SCL pins)
- Line 2-3: These are header files for the ESP8266 Wifi shield and Blynk
- Line 4: Include the library for the pressure sensor (we just downloaded that)
- Line 8: You should receive a token from Blynk when you create a new project, email this token to yourself and input it here
- Line 12-13: You (home) wifi name and password
- Line 19-32: Initialize the board and the sensor, connect to wifi. This block is mandatory.
- Line 34-38: Keep updating the pressure and forward that to Blynk. This block is mandatory.
- Line 40-46: Assign values to the global variables pressure and tempf, and forward these values to the virtual pins 0 and 1.
- NOTE If you see the error “the function (getPressure) isn’t declared”, move the getPressure block up above the loop block.
Blynk setup
To start
- Create a Blynk account.
- Create a new project in Blynk, and select the hardware model SparkFun ESP8266 Thing.
- Get Auth Token, and type it into the Arduino Sketch code.
Then in the project, create the following
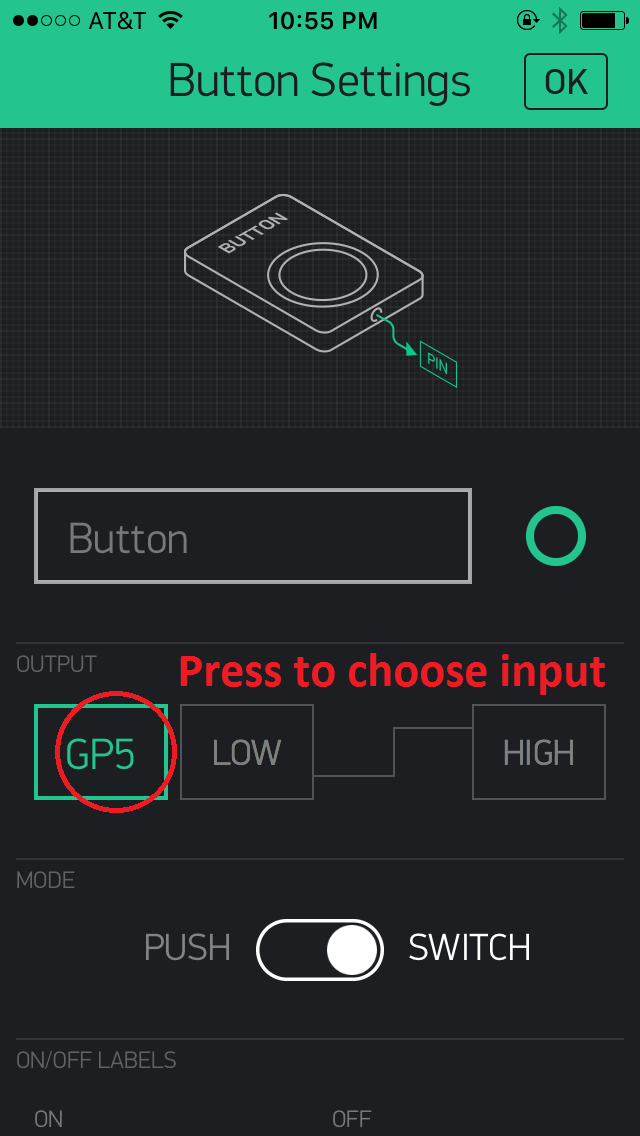
- A button: Set output of the button to “Digital - GP5”, this particular pin correspond to the LED on the Thing board. If you look close enough, you can see “5” next to the LED on the board.
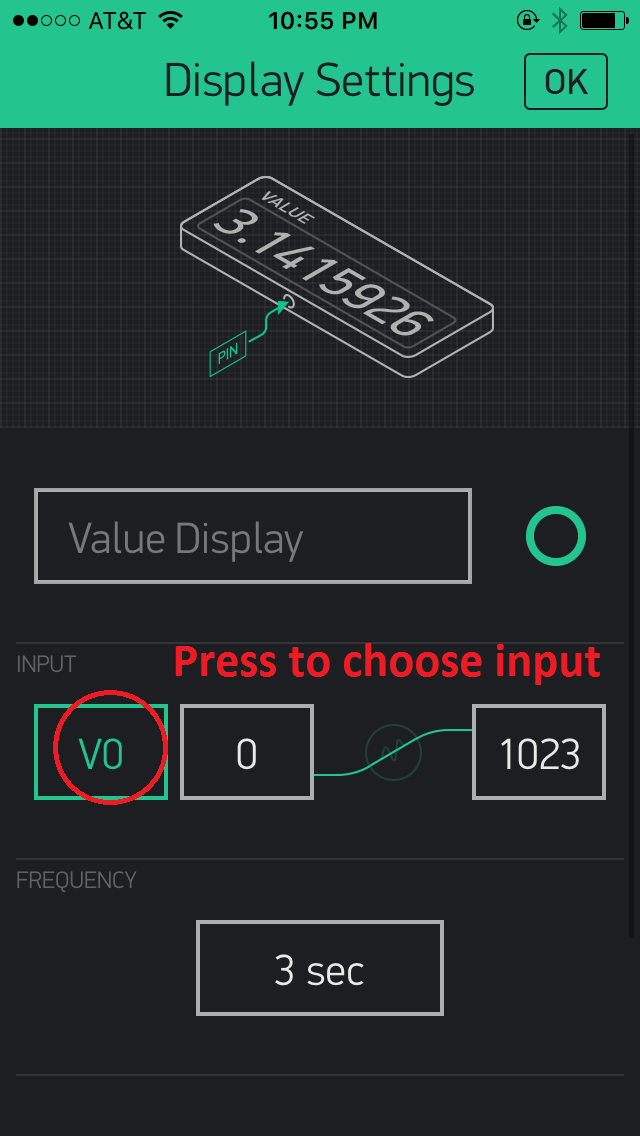
- Two value displays: Set the inputs to “Virtual - V0” and “Virtual - V1”, respectively. If necessary, you can also come back to fine tune the value range.

That’s about it! Now turn on the Thing and hit the run button on Blynk. You should be able to (1) see the current room temprature (give it some time to converge) and the pressure, and (2) turn on the LED by clicking the button in Blynk.
Hint: Sometimes the Blynk server can be slow, or even unavailable. You can turn the Thing off and on to get back wifi connection.