IoT - Piezoelectric sensor hookup guide - MAE540-2017 Team 1
By Brandon Butterfield, Rutvij Naik, Sankaranand Ramasamy, Sai Nizampatnam, Sujeet Krishnan
Introduction to Piezoelectric sensor
- Piezo sensors generate electric charge on the application of stress.
- They are unique because they produce an alternating current (AC) voltage when stressed, converting mechanical energy to electrical.
- They are ideal for low-power flex, touch, and vibration sensing. Piezos can be used for energy harvesting.
- Piezo’s have the potential to produce very large AC voltage spikes - ranging upwards of +/-50V.
- Because they produce such high voltages, large resistors are often used to “load down” the piezo sensor in vibration-sensing applications.
Applications
- Piezo acts as a pressure sensor in the touch pads of mobile phones.
- In the automotive industry, piezoelectric elements are used to monitor combustion when developing internal combustion engines.
- The sensors are either directly mounted into additional holes into the cylinder head or the spark/glow plug is equipped with a built-in miniature piezoelectric sensor.
Item list
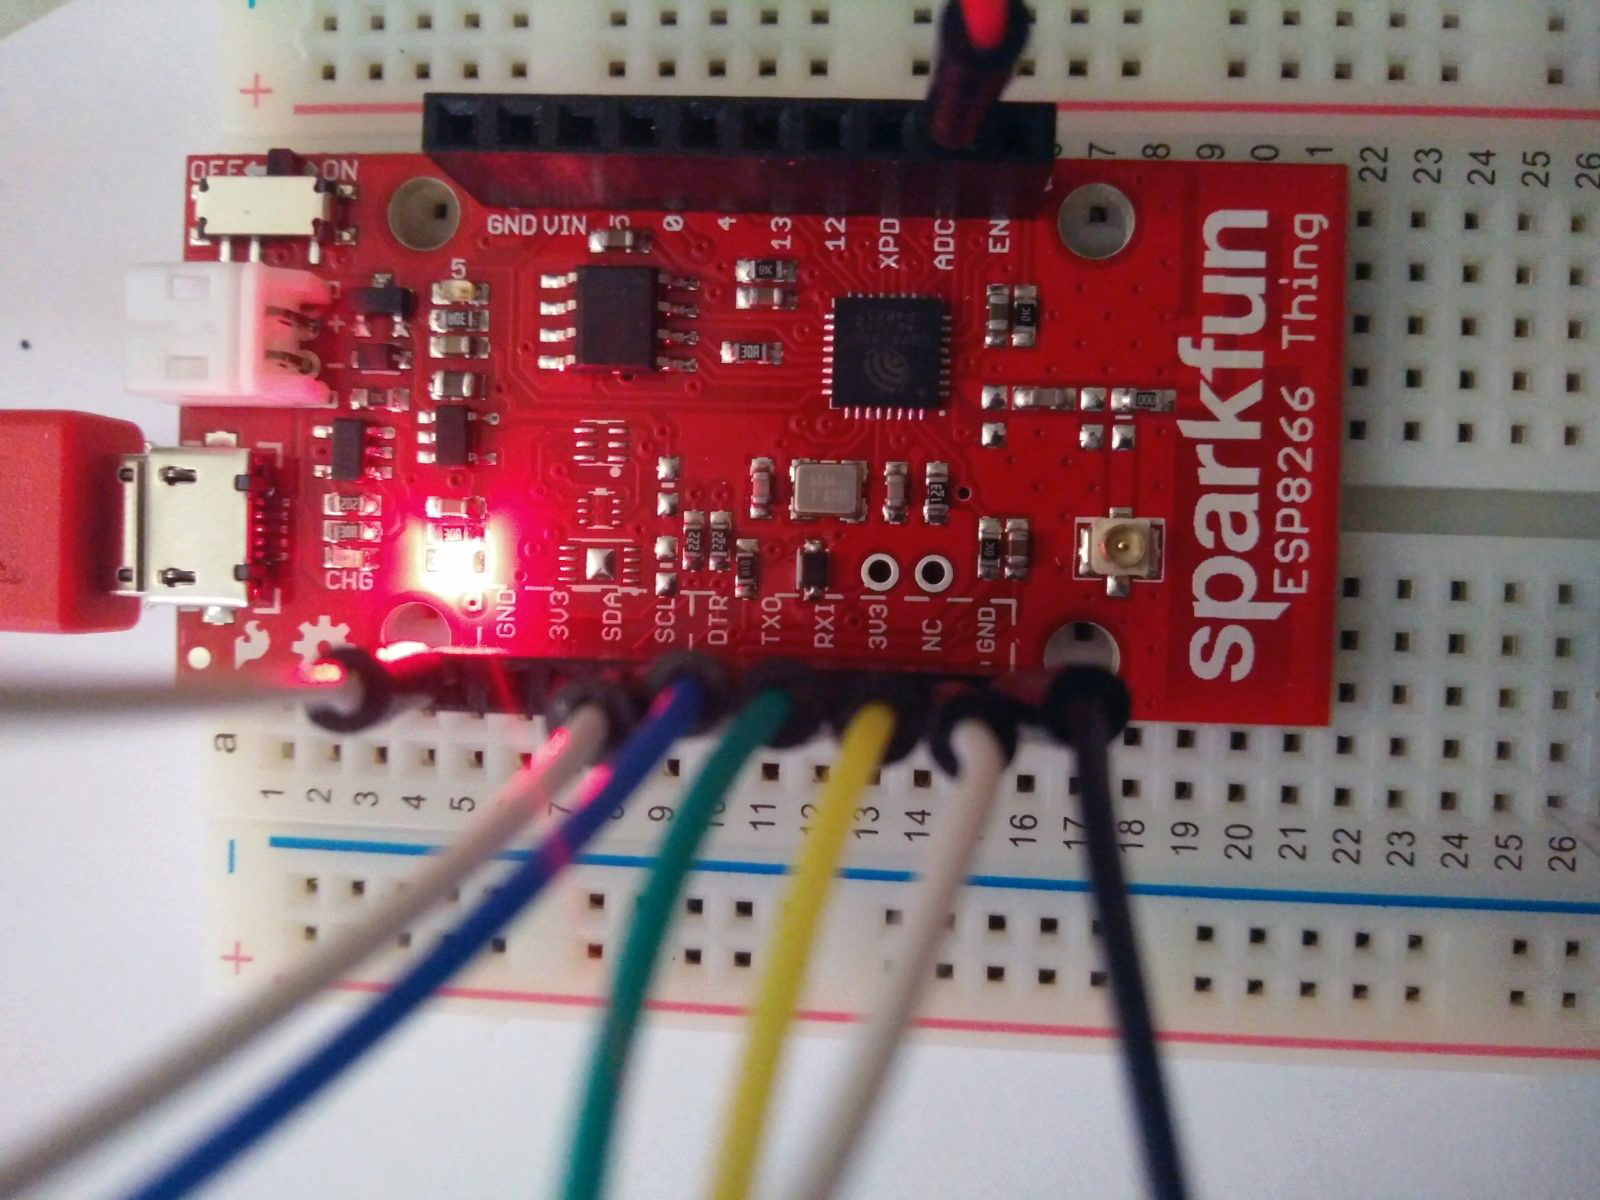
- The SparkFun ESP8266 Thing board
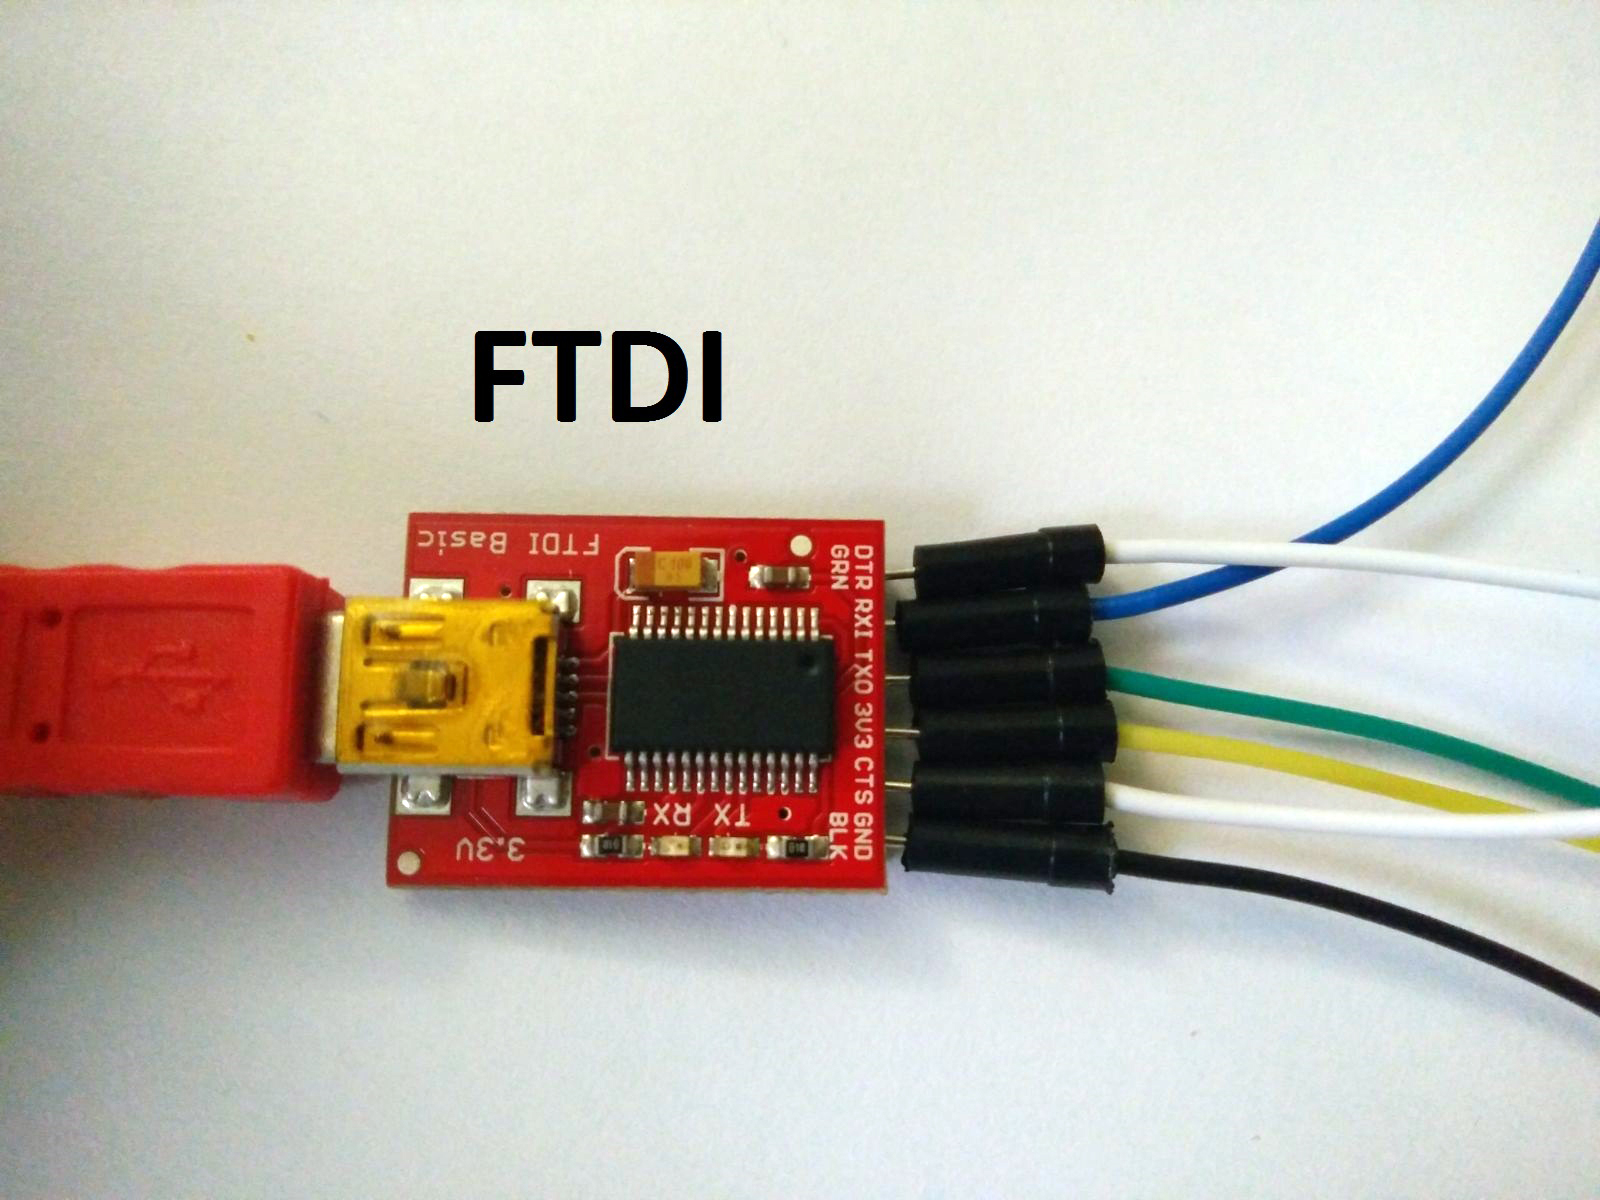
- FTDI Basic -3.3V
- SparkFun Cerberus USB Cable
- Jumper Wires and a Breadboard
- Arduino stackable header
- A Android/Apple smart phone and a computer
- Piezo Vibration Sensor large with Mass
- 1 Mega Ohm Resistor
Installation Guideline
Hardware setup
- Connect the wires to all the FTDI ends.
- Then, connect the other ends of the wire to ESP8266 board in a serial order and not according to the labelling on the board.
- For instance, the black wire on the FTDI will go to the last port of the ESP8266 board and so on.
- The Piezo sensor is grounded on one end, and a generated voltage is routed to the Arduino’s A0 ADC pin.
- Additionally, to dampen voltage spikes the Piezo sensor is loaded with a large resistor of 1 Mega Ohm. See figures below.

Software setup
- Download the [Arduino IDE] and install.
- Open the Arduino IDE. Install ESP8266 Arduino Addon:
- Go to File > Preference, type
http://arduino.esp8266.com/stable/package_esp8266com_index.jsoninto the “Additional Board Manager URLs” text box. Hit OK. - Then go to Tools > Boards > Boards Manager, search “esp8266”, and install it.
- Go to Tools > Boards, select “ESP8266 Thing”. If you don’t see it, close and reopen the IDE.
- Go to File > Preference, type
- On your smart phone, install “Blynk” and register. It’s free.
- Download the [Blynk library][blynklib]. Unzip it and move it to %myDocuments%/Arduino/libraries (%myDocument% should be %your_user_name/documents% on Windows).
Arduino Code
Now in Arduino IDE, open a new sketch, paste the following code: Type the Blynk Auth Token, Wifi name and password in the corresponding “***”
1
2
3
4
5
6
7
8
9
10
11
12
13
14
15
16
17
18
19
20
21
22
23
24
25
26
27
28
  #include <dummy.h>
  #include <Wire.h>
  #include <ESP8266WiFi.h>
  #include <BlynkSimpleEsp8266.h>

  // You should get Auth Token in the Blynk App.
  // Go to the Project Settings (nut icon).
  char auth[] = "***"; // ***Type in your Blynk Token

  // Your WiFi credentials.
  // Set password to "" for open networks.
  char ssid[] = "***"; // ***your wifi name
  char pass[] = "***"; // ***and password
  const int PIEZO_PIN = A0; // Piezo output
  void setup()
  {
    Blynk.begin(auth, ssid, pass);
    //Serial.begin(115200);
   }
  void loop()
  {
    Blynk.run();
    int piezoADC = analogRead(PIEZO_PIN); // Reads analog data from the sensor.
    float piezoV = piezoADC / 1023.0 * 5.0;
    Blynk.virtualWrite(V0, piezoV); // Writes output voltage to virtual pin 0 on the Blynk app.
    Blynk.virtualWrite(V1, piezoV); // Writes output voltage to virtual pin 1 on the Blynk app.
    Blynk.virtualWrite(V2, piezoV); // Writes output voltage to virtual pin 2 on the Blynk app.
   }
Blynk Setup
Since there is a conflict between the chip and serial monitor, Blynk is used instead.
- Create a Blynk account.
- Create a new project in Blynk, and select the hardware model ESP8266.
- Get Auth Token for the new project, and paste it at the blynk token in the Arduino Sketch code given above.
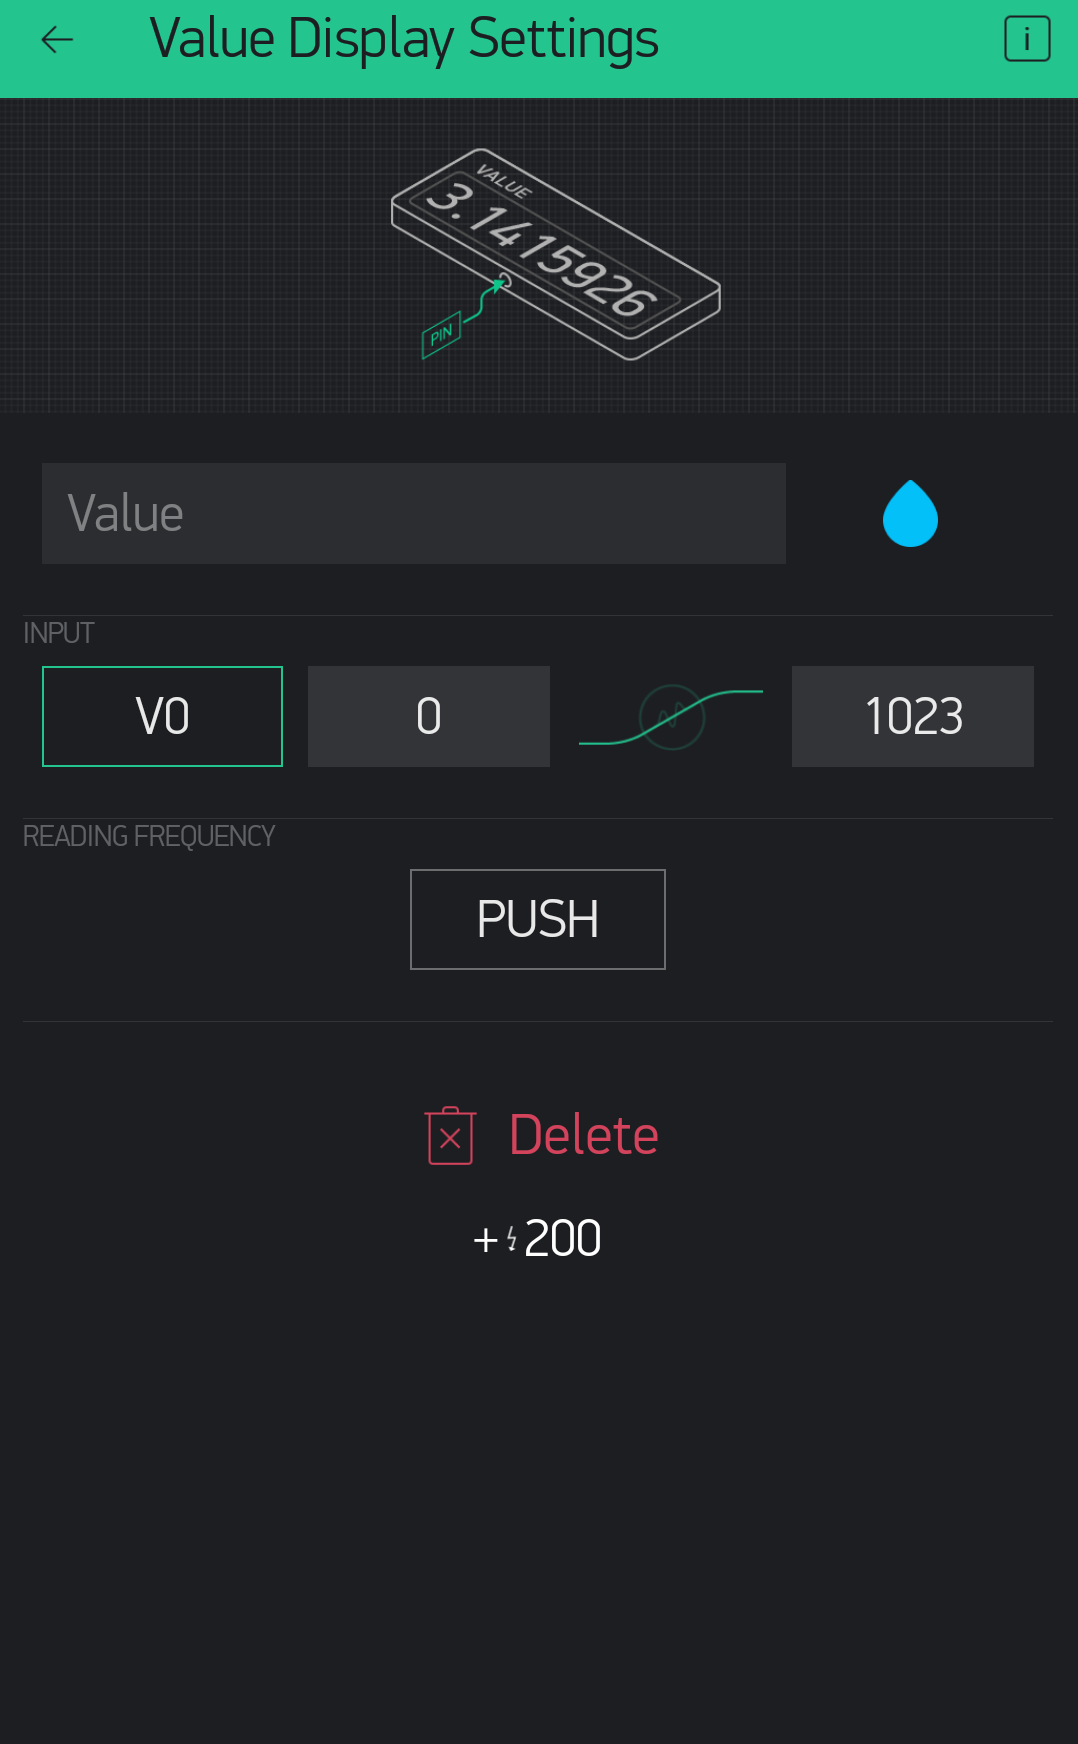
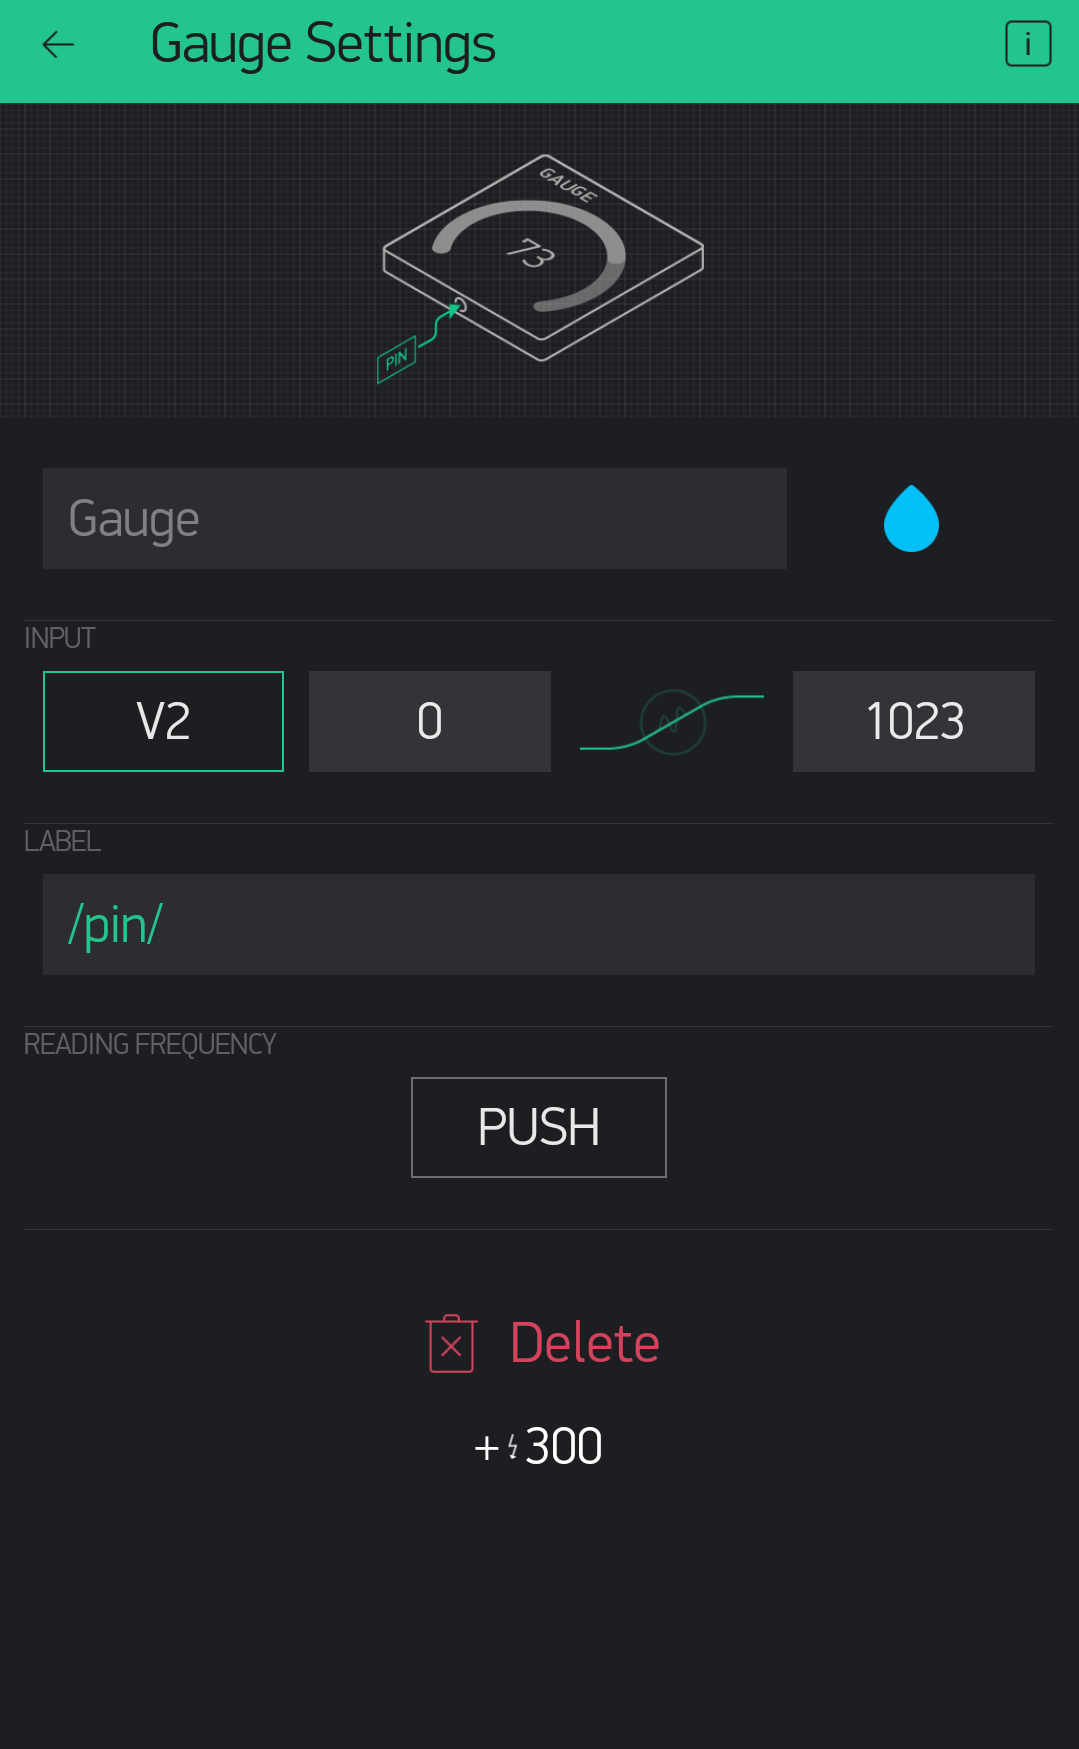
- On Blynk, add a value display widget. In the Blynk value display widget settings and then click on pin to select virtual pin V0.
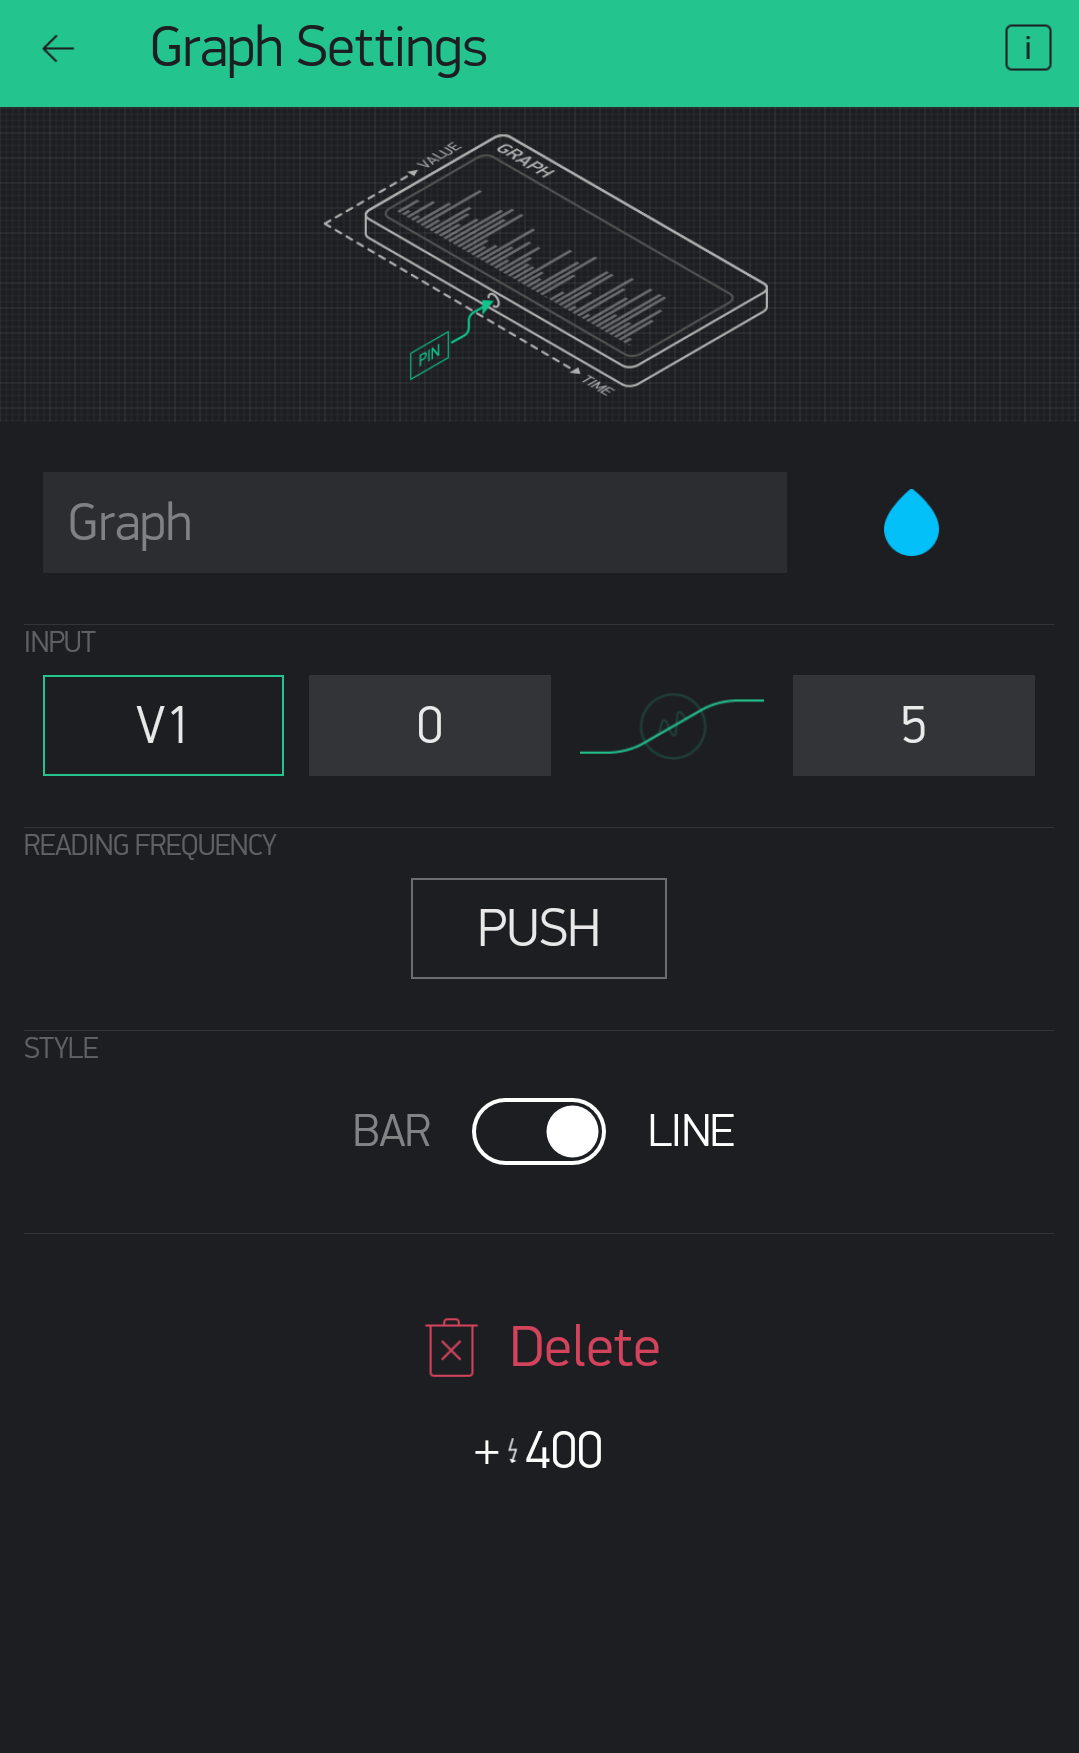
- Similarly, add graph and gauge widget.
- In all the widgets, frequency of requests is set to push.
The experiment and discussion
- An experiment is conducted to detect vibration using this sensor.
- After ensuring that the connections to the computer system and the boards are proper, the ESP8266 thing is turned on and code is uploaded.
- Vibrations are generated by flicking the sensor repeatedly with different force and strength.
- click the Play icon on the top right corner of the app to get the Blynk running.
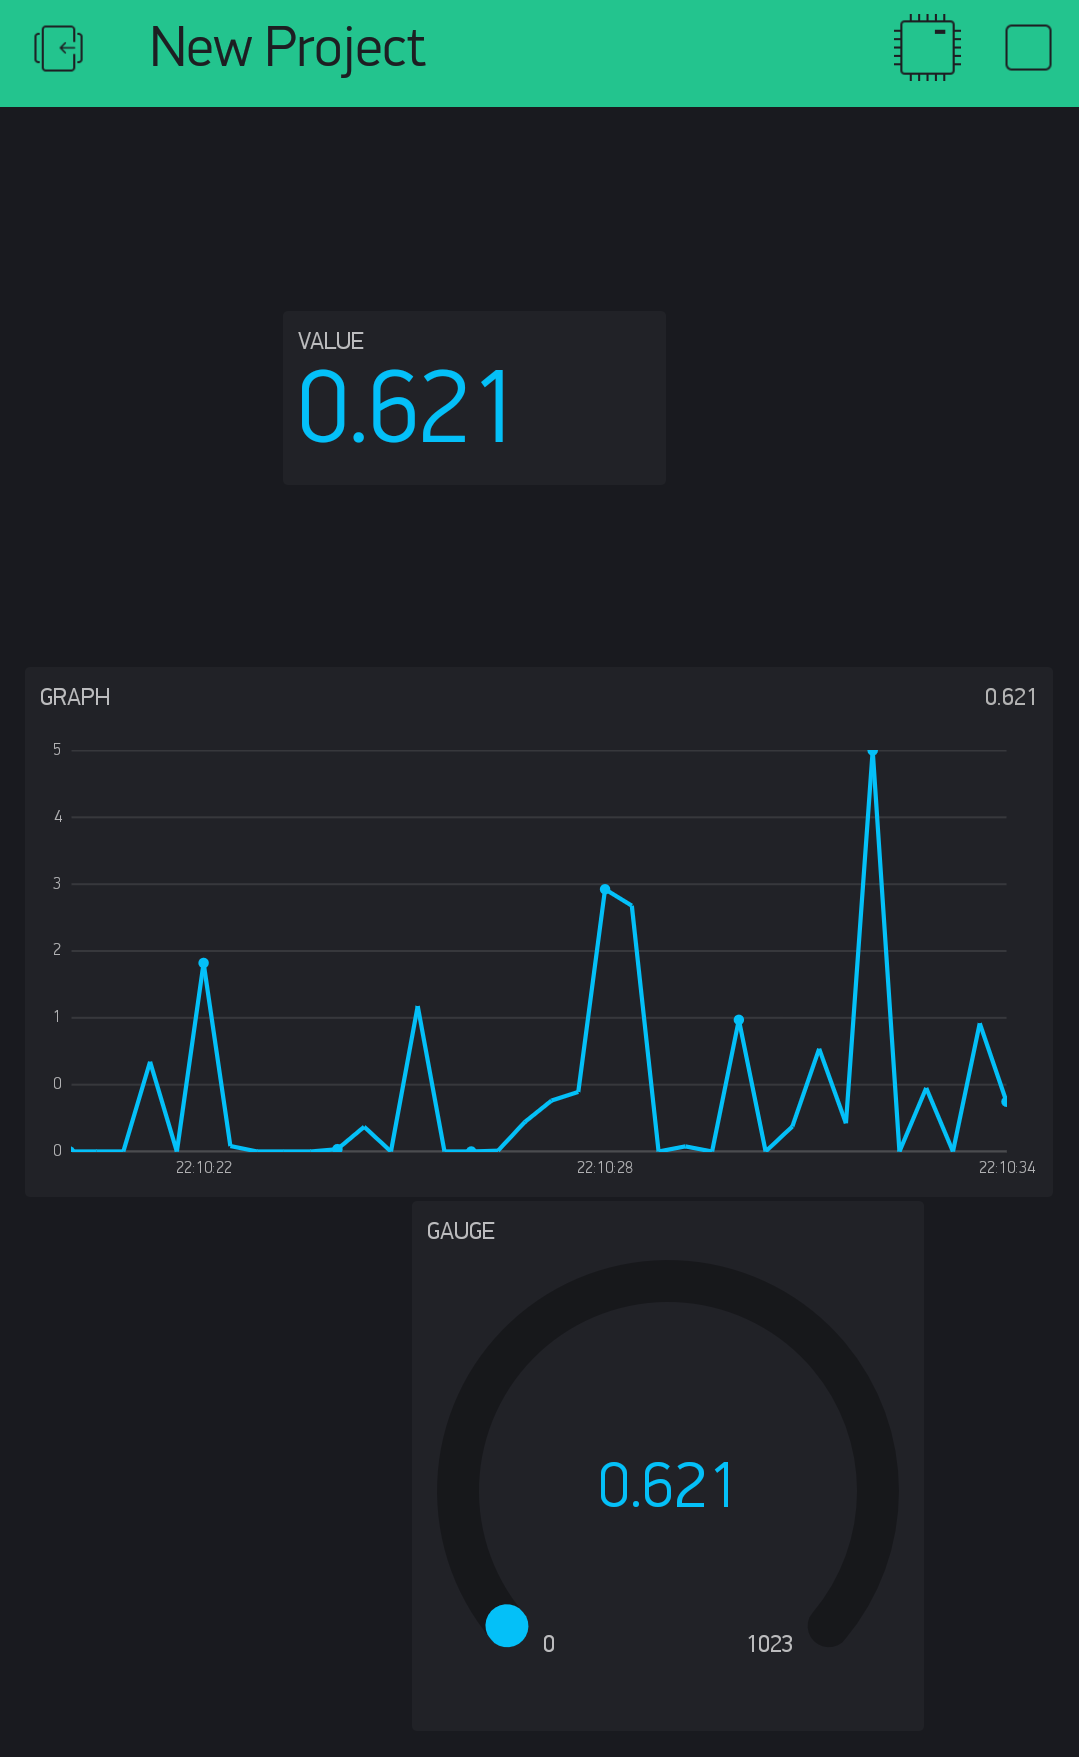
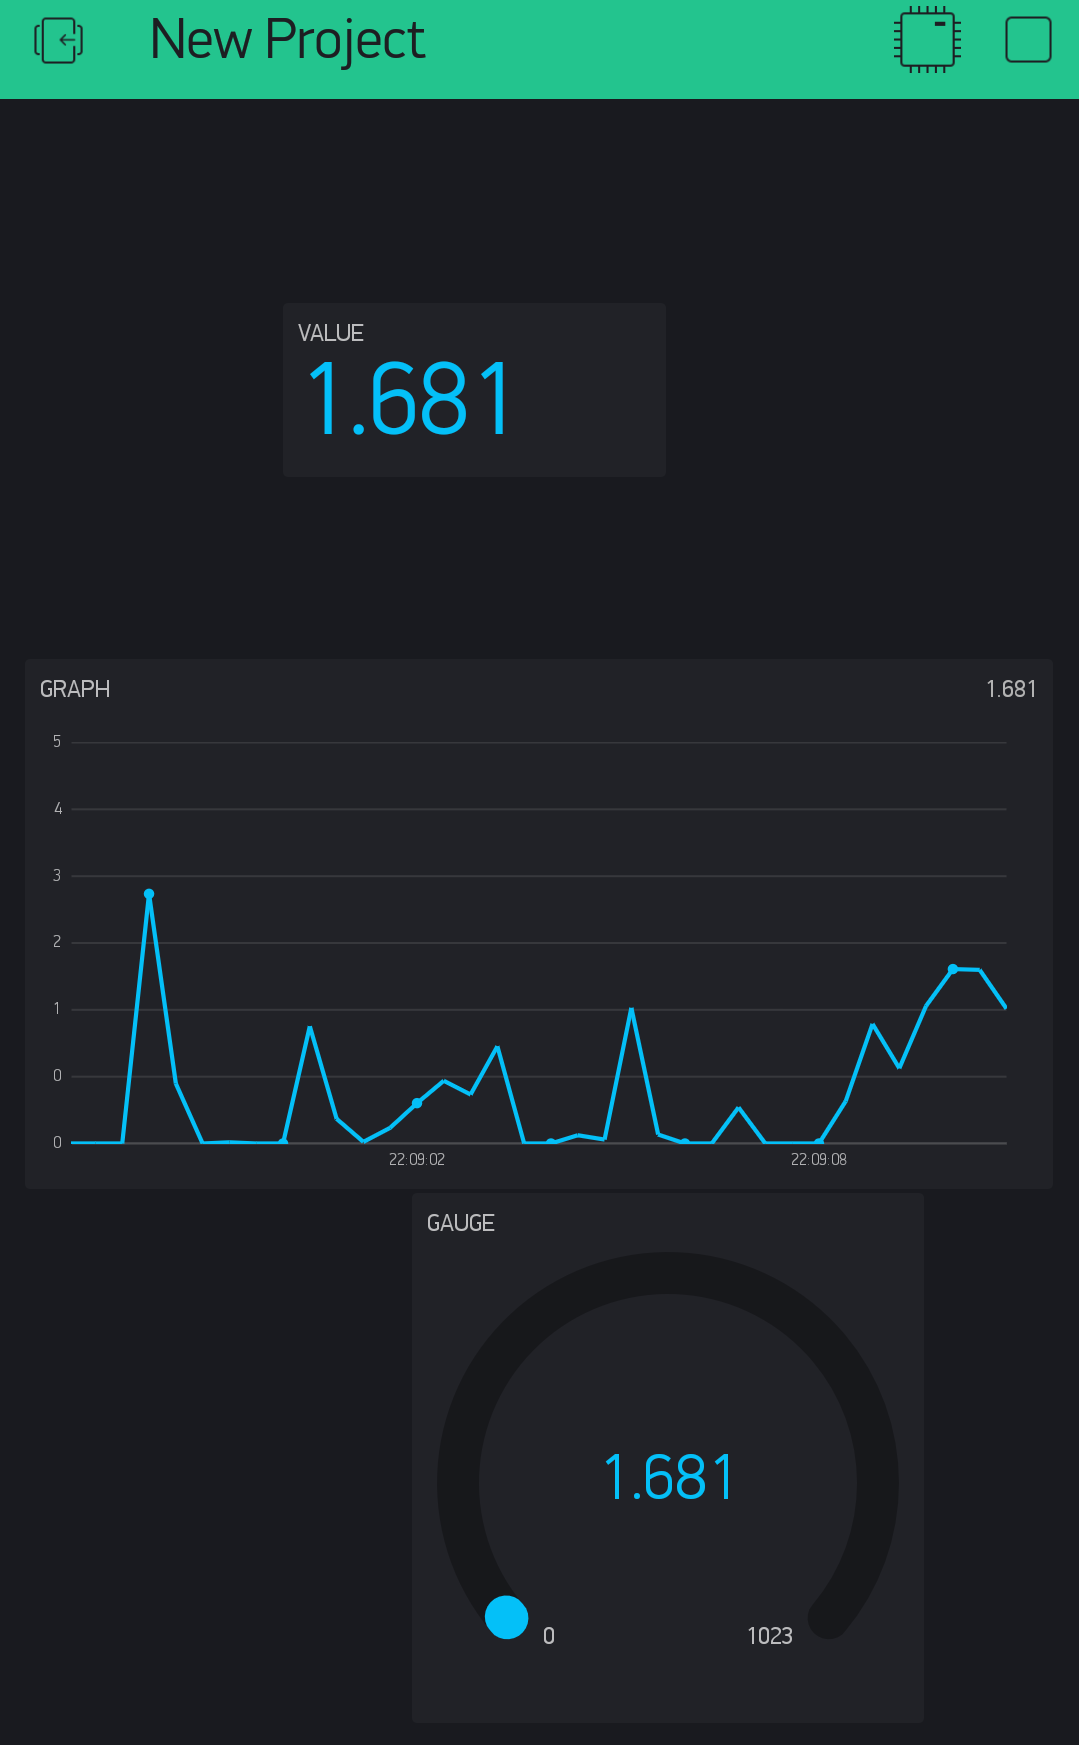
- The results shown above are the voltage signals generated from the piezo sensor. It ranges from 0 - 5V.
- To view the analog values, one can just change piezoV in Blynk.virtualWrite to piezoADC.
- Vibration threshold can be adjusted according to the project needs.
- Arduino can be calibrated to look for any measurements above the threshold value to detect vibrations.
Debugging tips
-
If the ESP8266 is off you would receive an “upload_mem” error.
-
campus wifi does not work for the Thing due to its security settings. One can turn on hotspot on your phone and set up ssid and password from there. The Thing will then connect to your phone.
-
If you encounter the error: “warning: espcomm_sync failed…”, there could be three reasons: Check if the Thing is turned on! The switch is on one corner of the board. You should see a red light on once the board is turned on. In the IDE, check Tools>Port to see which serial port you are using. Remember that both the Thing and the FTDI are hooked up through USB, the one we should use is the USB Serial Port rather than Communications Port. To find the right port, go to Device Manager (on Windows, it’s under Control Panel>System and Security>System) and check “Ports”.
-
The problem disappears when you re-upload, if the port is chosen correctly.